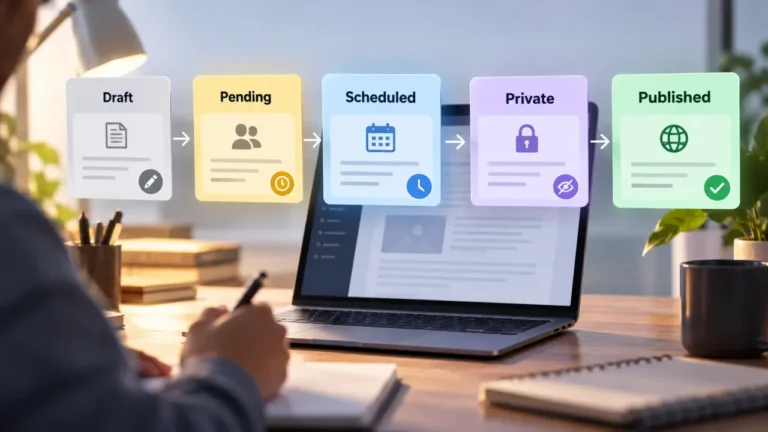


Short answer: an editorial workflow for solo blogger work keeps six stages: choose the topic, brief yourself, draft, review after a gap, run a pre-publish check, then publish with an update date. What you drop is the handoff machinery, meaning assigning, submitting for approval and waiting on sign-off. What you cannot drop is the job each handoff was doing. With no second person, the second reader becomes a time gap and the approver becomes a written checklist.
That is the whole idea. The rest of this article shows how each team stage shrinks, which ones survive intact, and how to review your own writing when nobody else will.
Why team workflows do not fit a one-person blog
Most published workflow advice is written for teams, and it shows. The stages are organized around people passing work to other people: a writer hands to an editor, an editor hands to an approver, an approver hands to whoever presses publish. If you want the full vocabulary, our piece on the stages every publishing process has is the short version of that map.
Your publishing platform often carries the same assumption. WordPress.org’s Post Status documentation (read September 23, 2026) describes a Pending status for a post that is waiting for a user with publishing rights to publish it. That is a handoff by design. On a one-person site, nobody is on the other end of it. WordPress is only one example here; Ghost, Webflow, Squarespace and most other platforms give you some version of draft, scheduled and published, and every one of them lets a solo owner skip straight from draft to live.
That shortcut is the real risk. A team workflow fails when handoffs stall. A solo workflow fails because there are no handoffs at all, so nothing forces a pause between “I finished typing” and “readers can see it.”
The editorial workflow for solo blogger work, stage by stage
The useful way to build a solo process is subtraction. Start from the full team sequence and ask one question of each stage: was this stage about coordinating people, or about protecting the article? Coordination stages go. Protection stages stay, in a smaller form.
| Team stage | What it protects | Solo version | Verdict |
|---|---|---|---|
| Pitch and topic approval | Focus on the right topics | A one-line “why this, why now” note | Merge into planning |
| Brief | The writer knows the job | A five-line self-brief | Keep, shorter |
| Assignment | Nothing, it routes work | None | Drop |
| Drafting | The content itself | You, in one focused session | Keep |
| Structural and line edit | Argument, clarity, flow | You, after a time gap | Keep, change the method |
| Copy edit and fact check | Errors and wrong claims | A checklist pass plus a claims list | Keep, as a checklist |
| Final approval | Nothing ships unfinished | A written definition of done | Replace with checklist |
| Scheduling and publishing | Timing, formatting | You, from a preview | Keep |
| Updating | Accuracy over time | A review date on every post | Keep |
Two stages disappear entirely. The rest shrink. None of the protection stages vanish, because the risks they cover still exist when you are working alone.
The six stages you still need
1. Choose the topic with a one-line test
A team runs pitches past an editor so weak ideas die early. You can do the same job with one sentence written before you start: who is this for, and what will they be able to do after reading it? If you cannot finish that sentence, the idea is not ready. Keep an idea list and only promote an item to the next stage when the sentence is written.
2. Brief yourself, even though you are the writer
Solo bloggers skip the brief because it feels like writing a note to yourself. It is exactly that, and it earns its place. A self-brief of five lines covers the reader, the single question the post answers, the angle, what you already know, and what you need to look up. Writing it takes minutes. It stops the most common solo failure: a draft that wanders because you started typing before you decided what the post was for.
3. Draft without editing
Drafting and editing use different parts of your attention. On a team they are done by different people, which enforces the split. Alone, you have to enforce it yourself. Write the full draft in one pass, marking gaps with a placeholder word you will search for later, and do not stop to polish sentences. Polishing too early is how drafts stall halfway.
4. Review after a gap
This is the stage that changes most when you work alone, so it gets its own section below. The short version: never review a draft in the same sitting you wrote it.
5. Run a pre-publish check instead of asking for approval
On a team, one person signs off. Our article on why one final approver fixes most broken workflows explains why that single sign-off matters. Solo, you are that approver, which is precisely the problem: you are also the person who wants the post out. A feeling of “looks done” is not approval. A written checklist is. Keep it short enough to run every time:
- Does the opening answer the question the self-brief named?
- Is every number, date, price or quote backed by a source you can name?
- Do all links work, and do they point where the anchor text says?
- Have you checked the preview on a phone-sized screen?
- Are the title, excerpt and any meta fields filled in?
- Did you search the draft for your placeholder word?
If any answer is no, the post is not done. That is the whole approval stage.
6. Publish, then set an update date
Publish from the preview, not from the editor, so you see what readers see. Then note a review date for the post. Posts that cite tools, prices or platform features go out of date, and nobody else on a one-person site will notice when they do.
How to be your own second reader
The top-ranking guides on this topic list “self-review” as a step and move on. That skips the hard part. A second reader catches what the writer cannot see, because the writer reads what they meant to write instead of what is on the page. Alone, you have to manufacture that distance. Four methods do most of the work.
Put time between writing and reviewing. Leave the draft overnight at minimum. The point is to come back as a reader who has partly forgotten the intent, so the text has to carry the meaning on its own. Your drafting schedule should build this gap in, which means finishing drafts a day or more before they are due, not the night before.
Change the medium. The same text looks different in a different format, and the change breaks your familiarity with it. Read the post in your platform’s preview rather than the editor. Ghost’s help page on publishing and scheduling (read September 23, 2026) notes that its preview shows how content appears on the web and in email newsletters, on both desktop and mobile, and that you can send yourself a test email to see it in a real inbox. Most platforms have a comparable preview. Reading aloud and printing are older versions of the same trick.
Do one pass per job. A team splits editing across people; you split it across passes. First pass: does the argument hold, and is anything missing or out of order? Second pass: sentence-level clarity. Third pass: the checklist from stage five. Trying to do all three at once means doing each badly.
Keep a list of your own repeat mistakes. Every writer has habits: a pet phrase, a tendency to bury the answer, a word you always misspell. When you catch one, add it to a short running list and check against it on every post. Over time that list becomes a one-page personal standard, which is the solo version of an editorial style guide for a blog.
Tracking status without a project tool
A team needs a board so everyone can see where work sits. You only need to know it yourself, and the lightest system that answers “what is waiting on me?” is the right one. Use the draft list in your CMS plus one simple note or spreadsheet with a status per post:
- Idea: has a one-line test sentence
- Briefed: self-brief written
- Drafted: full draft exists, not reviewed
- Resting: waiting out the review gap
- Checked: passed the pre-publish checklist
- Live: published, with a review date noted
The “resting” status matters more than it looks. It makes the gap visible, so a draft cannot slip from written to published without passing through it.
What you honestly lose by working alone
A solo process protects against most errors, but not all of them, and it is better to know which ones.
Blind spots in framing. Time and checklists catch typos, broken links and unsupported claims. They rarely catch a wrong angle, a missing perspective or an argument that only makes sense to you. Only another person does that reliably.
Pushback on weak ideas. An editor kills a pitch. Nobody kills yours. The one-line test helps, but it is a filter you apply to yourself.
Subject-matter checks. If a post makes claims in an area where you are not the expert, your own review cannot verify them. Cite primary sources, or leave the claim out.
The practical fix for all three is selective: ask someone outside for a read on the posts that carry the most risk, such as anything that gives instructions, makes factual claims about products or services, or that you expect to be your most visible work. You do not need a second reader for every post, only for the ones where being wrong costs the most.
The workflow also cannot create time. If the six stages above do not fit your week at your planned publishing pace, the fix is a slower pace, not skipped stages.
When a solo workflow stops being enough
Three signals suggest it is time to add a second person, even part time. Drafts pile up in “resting” and never reach “checked.” Errors keep reaching live posts despite the checklist. Or you are the bottleneck on work that someone else could do. At that point the handoff stages come back, and our guide to the editorial workflow for a team of two to five covers how to rebuild them without overbuilding.
FAQ
Does a solo blogger need an editorial workflow at all?
Yes, but a short one. The purpose of a workflow is to put a pause and a check between writing and publishing. Working alone removes the people who normally enforce that pause, so a written process is the only thing that does.
How many stages should a solo blogger’s workflow have?
Six is enough for most one-person blogs: choose the topic, brief yourself, draft, review after a gap, run a pre-publish check, and publish with an update date. Assignment and approval handoffs can be dropped because there is nobody to hand off to.
How do I edit my own blog posts without an editor?
Create distance. Leave the draft overnight at least, review it in a different format such as your platform’s preview or a printout, and split editing into separate passes for structure, sentences and a final checklist. Keep a running list of your own repeat mistakes and check each post against it.
Do I need editorial workflow software as a solo blogger?
Usually not. Your CMS draft list plus a simple note or spreadsheet with a status column covers one person’s needs. A dedicated tool starts to make sense when more than one person needs to see the same pipeline.